
Functional Testing For Node.js Using Mocha and Zombie.js
In Agile development, developers write tests before implementing a feature. Unit tests should already be in your ADN, so let's talk about functional tests instead. Functional tests are the technical translation of the acceptance tests written by the customer at the back of a user story card. Let's see how to achieve functional testing for Node.js applications.
Contact Should Be Easy
The customer wants a contact page. She wrote the following User Story:
As a user,
Given I found the contact page,
I want to fill in my contact information and message,
and have it sent to the site owner.
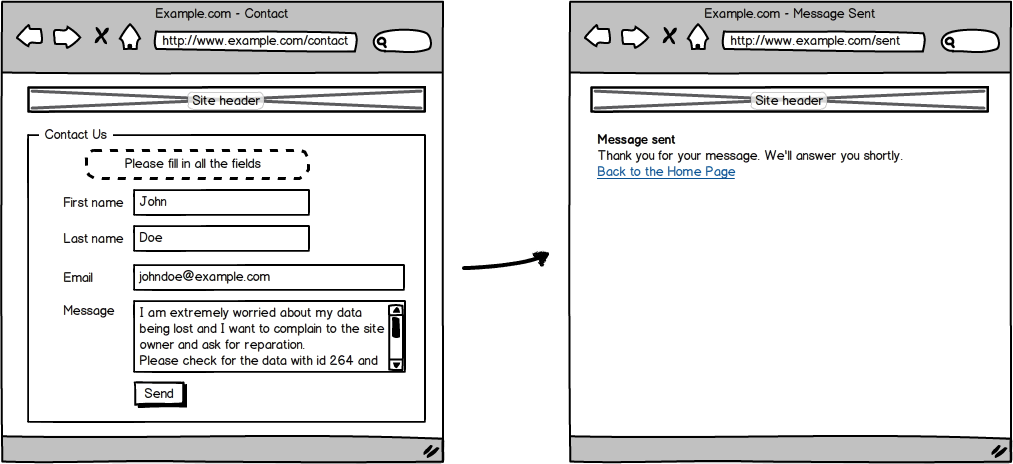
Here is the mockup associated with the story:
While discussing this story with the customer during a planning poker, the team lists the acceptance tests that the application should pass to validate the user story:
- The contact page should show a contact form
- The contact page should refuse empty submissions
- The contact page should refuse partial submissions
- The contact page should keep values on partial submissions
- The contact page should refuse invalid emails
- The contact page should accept complete submissions
You could rush to implement the contact page requirements, and then check the acceptance tests by hand with a web browser. But that wouldn't be very agile.
Write Tests First
In test-driven development, you should write tests first. Let's bootstrap a file called test/functional/contact.js:
If this looks exactly like the acceptance tests written above, that's for a reason. This first step could, in theory, be achieved directly by the Product Owner, because it requires no knowledge of anything technical.
Next, run the tests. That's right, even before you write the first line of the actual contact page, you should run the tests. This tutorial uses the mocha test framework, so either add it to your package.json in the devDependencies section, or better, install it globally once and for all:
$ npm install -g mocha
Now you can run the new (empty) functional test:
$ mocha test/functional/contact.js

  ......

  ✔ 6 tests complete (2ms)
  • 6 tests pending
So far, so good: all the tests are pending.
Functional Tests as The Application Specification
Before implementing the functional tests, let's switch to another way to output mocha tests results: the "spec" reporter. To do so, either add the --reporter spec option when calling the mocha command, or even better, add it to the test/mocha.opts file and you'll never have to add it again. And since you're adding command line options for mocha, opt for the --recursive option, which tells mocha to look for JavaScript files with describe() statements under the whole test/ folder hierarchy.
--reporter spec
--recursive
Now running the test is easier (no need to specify the test to run) and takes a whole new dimension:
$ mocha

  contact page
    - should show a contact form
    - should refuse empty submissions
    - should refuse partial submissions
    - should keep values on partial submissions
    - should refuse invalid emails
    - should accept complete submissions


  ✔ 6 tests complete (2ms)
  • 6 tests pending
The "spec" reporter takes advantage of the describe() and it() descriptions to display a nicely formatted list of application requirements. That way, you can even let the Product owner look at the test results, and the tests document the code.
Set Up The Application
Functional tests should browse a special version of the web application - the "test" application. This version should use test data, test configuration, and should not interfere with the development or production versions. A good practice is to setup test data and start a new instance of the application inside each functional test. The ideal place to put the related code in is the before() function, that mocha executes... before the tests. And of course, don't forget to close the application test instance when the test ends.
Tip: The before() function starts the server on a custom port, to avoid side effects on the development version of the application. In order to allow a Node.js server script to be started by functional tests, it should be exported as a module, and start (or "listen") only when called directly. This is how the main server.js file should end:
Tip: If you want to use different configuration values for the test environment, you should use an environment-aware configuration utility. I recommend the excellent config module for that purpose.
Set Up The Browser
Functional tests are scenarios mimicking the actions of a user through a browser. You'll need a simple browser for the contact page tests. In fact, a headless browser (without GUI) with limited JavaScript capabilities should do the trick. That's exactly what zombie.js is, and it's the perfect tool for the job.
Add zombie to the package.json file:
Then install it (with npm install) and edit the contact functional test file again:
You can add as many before() calls as you wish in a functional test; mocha executes them in series. The second before() call is asynchronous - you can tell from the done callback passed as parameter to the before() argument function. In this function, the browser's visit() method loads the contact page, waits for the page to fully load and process events, and then calls the done callback function - allowing mocha to start actual tests.
The Very First Test
A functional test is a simple callback function. Mocha considers the test as valid if the function doesn't throw any error. You can either test assertions manually and throw errors upon unexpected result, or use an assertion module. Node.js comes with the assert module, which is more than enough for the contact page functional tests.
These three assertions are pretty basic. They check that the page returns an HTTP code 200, that it's actually the contact page, and that it contains a form with several fields labeled as in the mockup. The Zombie browser text() function takes a CSS selector as argument, and returns the text of the matching element(s) in the DOM. It's a very straightforward way to implement functional tests assertions.
Now that the test suite has one real test, it's time to run it:
$ mocha

  contact page
    1) should show a contact form
    - should refuse empty submissions
    - should refuse partial submissions
    - should keep values on partial submissions
    - should refuse invalid emails
    - should accept complete submissions


  ✖ 1 of 6 tests failed:

  1) contact page should show a contact form:
     Error:...
The test fails, which is normal. The page content doesn't exist yet. You should always check that a test fails if the implementation is wrong, and running a test before actually starting the implementation is the best way.
The implementation of the contact form is left as an exercise to the reader. Depending on the framework and templating engine you use, this implementation may vary a lot. But you have one obligation: it must pass the test. That means that once the implementation is finished, running the test should yield the following result:
$ mocha

  contact page
    ✓ should show a contact form
    - should refuse empty submissions
    - should refuse partial submissions
    - should keep values on partial submissions
    - should refuse invalid emails
    - should accept complete submissions


  6 tests complete (20 ms)
  5 tests pending
Asynchronous Tests
The second test should check that an empty form submission displays the form again with an error. Whether you choose to implement this client-side or server-side (you should do both), this implies interacting with the contact form. The Zombie browser provides a full-featured API to interact with page content, including pressing a submit button via pressButton():
The pressButton() method is asynchronous ; it presses the button, submits the form, loads the server response, and executes all browser events until there is no one left. That's why it takes a callback as parameter - and also why the enclosing mocha test must be considered asynchronous as well. Therefore, the mocha it() test uses a done callback to be called when the test is finished. Mocha deals with asynchronous functions in it() just like in before().
Apparently, this test works fine. However, if any of the assertions ever fails, then the execution flow of the pressButton() callback stops, and done() never gets called. So Mocha will report the page as timed out, even though the problem is of another nature.
Zombie supports Promises (powered by q) to overcome this problem. Promises propagate errors implicitly to the last call, and therefore are compatible with tests. Here is how to rewrite the previous test using Promises:
Now if one of the assertion fails and throws an error, the error gets caught in the first then(), then passed passed to the second then() as argument to the first callback, resulting in done(error). Mocha will consider the test failed. If no error is thrown, the second callback passed to the last then() will be called with no argument at all, resulting in done(). Mocha will consider the test passed.
The then(done, done) construction may seem weird at first sight, but it's an efficient way to use the same callback for error and success, and it's the official way to make zombie and mocha work together.
Getting Things Done
Now that you know how to do asynchronous tests with mocha and zombie.js, it should not be hard to deal with the rest of the tests:
Run the new tests. They should fail. Now you just need to implement enough server-side logic to make the tests pass:
$ mocha

  contact page
    ✓ should show a contact form
    ✓ should refuse empty submissions (207ms)
    ✓ should refuse partial submissions (138ms)
    ✓ should keep values on partial submissions (142ms)
    ✓ should refuse invalid emails (142ms)
    ✓ should accept complete submissions (143ms)

  6 tests complete (1 seconds)
And you're done! Or are you?
Your Tests Are Wrong
You think these tests are correct? Try to change the order in which they are implented by placing the last one first, and run the suite again:
$ mocha

  contact page
    ✓ should accept complete submissions (191ms)
    1) should show a contact form
    2) should refuse empty submissions
    3) should refuse partial submissions
    4) should keep values on partial submissions
    5) should refuse invalid emails

  ✖ 5 of 6 tests failed:
     ...
The first test passes, but all the subsequent tests fail. Why? It's simple: the before() page loads the contact form once and for all. The test "the contact form should accept complete submissions" changes the browser page to the "message sent" page, where the contact form is nowhere to be found. Logically, all the subsequent tests fail because they try to submit a form which doesn't exist.
The solution? Rename the before() step loading the form to beforeEach(), so that mocha reloads the contact form before running each it() statement.
So here is the final contact page functional test:
I'm sure you can write a contact form which satisfies all these tests. But how about testing the fact that the contact form really sends an email to the site owner's address? Well, read again the beginning of this post: the Product Owner never wrote such an acceptance test, so it's another story. Or, it could be a supporting argument for another post labelled "why developers should help product owners write acceptance tests".
You Should Do Tests
Asynchronicity aside, writing functional tests in Node.js is quite simple. Using the assert module, mocha, and zombie.js, you should be able to implement most of the scenarios imagined by the product owner, and never do a manual browser test again.
However, be aware of certain limits. Zombie.js is not a real browser, so it may behave differently that your (headed) desktop browser. When dealing with complex client-side JavaScript, you should probably replace zombie.js by phantomjs, which is a fully functional webkit browser. The only problem is that it's also much slower than zombie.js, and that it comes with its own JavaScript execution stack.
And despite the relative youth of the Node.js stack, this post shows that Node is already compatible with a test-driven development workflow, and with agile methodologies. So don't wait, jump on the bandwagon!
Tweet
Published on 15 Jan 2013
with tags agile NodeJS
 Redo The Web, a blog by François Zaninotto
 fzaninotto
 @francoisz
 rss
rss